Adding a Google Calendar to your WordPress site is something you can easily do in a few minutes. This is a complete easy step by step guide to add Google Calendar in WordPress.
Google Calendar has come to the most popular and highly effective tool for managing schedule, sharing events and integrating with other Google services like Gmail. This tool also comes with pretty smart features that easily organize everything around you.
Let’s explore the steps to integrate Google Calendar in your WordPress site in the following sections.
I will also walk you through with steps to make your Google Calendar public and how to display the Google calendar on your WordPress site?
-
How To Add Google Calendar in WordPress: Easy Step by Step Guide
- #Step 1: Install the Simple Calendar – Google Calendar Plugin
- #Step 2: Go to Google Calendar Plugin Setting
- #Step 3: Click on Google Developers Console Link
- #Step 4: Create a Project at Google API Console
- #Step 5: Enter Your Project Name
- #Step 6: Find the Google Calendar API
- #Step 7: Enable the Google Calendar API
- #Step 8: Fill the details and Save
- #Step 9: Head over to the Credentials
- #Step 10: Now, Create Credentials for Google Calendar API
- #Step 11: API Key will be Created
- #Step 12: Copy Your Google Calendar API
- #Step 13: Enter the API Key into Calendar Settings
- How To Make Google Calendar Public?
- How To Add Google Calendar In WordPress?
- How To Display Calendar on Your WordPress Site?
- Display Google Calendar In Sidebar
- Wrapping It Up
How To Add Google Calendar in WordPress: Easy Step by Step Guide
#Step 1: Install the Simple Calendar – Google Calendar Plugin
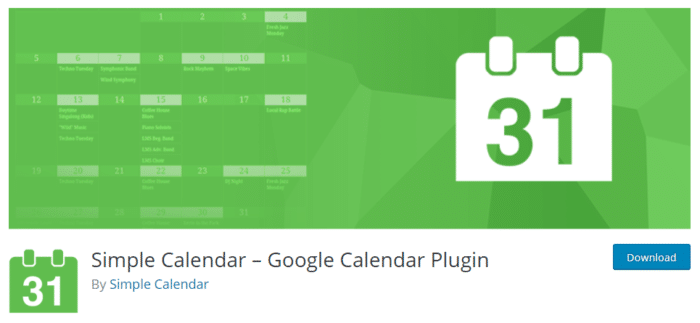
To add Google Calendar to your WordPress site, all you need to do is install the Simple Calendar – Google Calendar Plugin [1] in your WordPress and activate it.
#Step 2: Go to Google Calendar Plugin Setting
After activation, go to Calendars then plugin settings page.
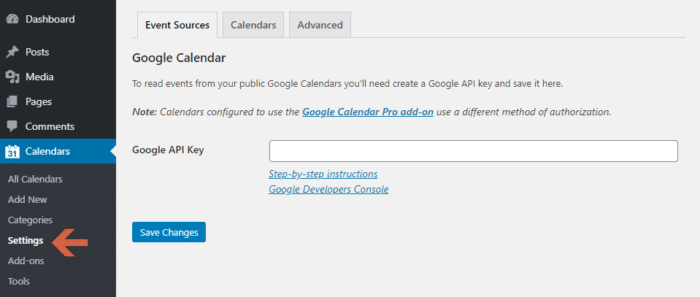
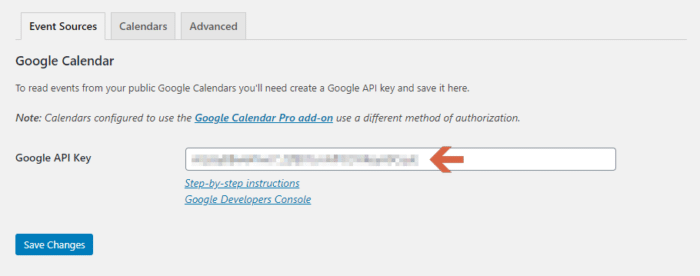
Now, all you need is to connect the plugin to your Google Calendar. For that first, you need to create and provide a Google API Key. This will give the plugin access to your calendar data.
#Step 3: Click on Google Developers Console Link
To create and provide Google API Key, you’ll find a link of Google Developers Console on the calendar setting page. Just click on that link and this will take you to the Google Developers Console website.
#Step 4: Create a Project at Google API Console
From the top right corner menu, click on “Select a Project” and choose “Create a Project” option.
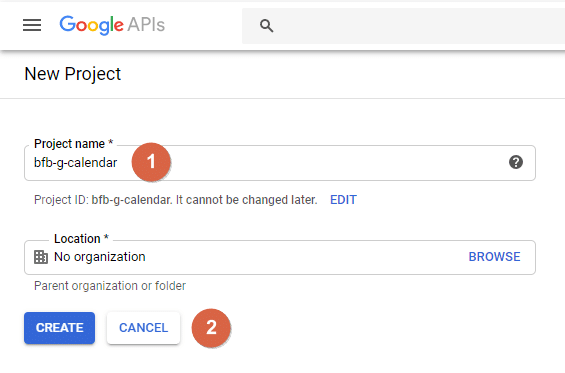
#Step 5: Enter Your Project Name
On the next page, you need to give a name for your project. Enter a project name whatever you want but I suggest you choose a name that helps you to identify the project quickly.
#Step 6: Find the Google Calendar API
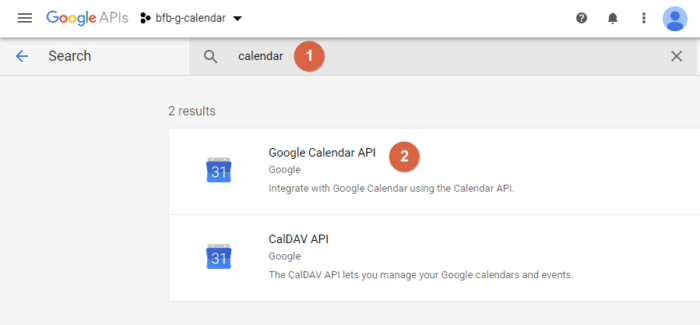
Once you click on the Create button this will redirect to your project dashboard. Click on Enable API and Services button and you will be redirected to Libraries pages. Search for the Google Calendar API as shown in the image below.
#Step 7: Enable the Google Calendar API
Click on the Enable button to continue.
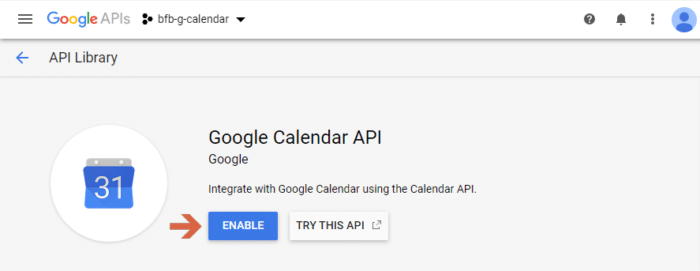
After enabling API, you still need the details on how you would access the API and what credentials you’ll be using.
#Step 8: Fill the details and Save
This will redirect you to a new page where you need to fill the data to generate the API Key. Provide a name to the API Key and leave the IP Address field blank. Click on the Create button.
#Step 9: Head over to the Credentials
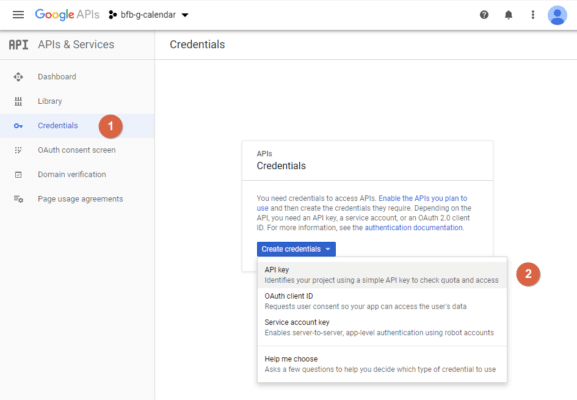
To continue with the process click on “Credentials” Tab from the API Manager left-hand sidebar.
#Step 10: Now, Create Credentials for Google Calendar API
This will take you to the next page “Credentials” page, where you find an option to “Create credentials.” Click on the menu and select “API Key” to create an API Key
#Step 11: API Key will be Created
A pop up will be generated saying ‘API Key Created’ and Now, an API Key will be generated.
#Step 12: Copy Your Google Calendar API
You can directly copy your Google Calendar API from there. Copy that API Key.

#Step 13: Enter the API Key into Calendar Settings
Now, paste API Key into the Calendar Setting Tab and click on the “Save Changes” button.
How To Make Google Calendar Public?
Google Calendar not just only organize your schedule, you can do many other things. You can also use it to share any event with others.
So if you want to make your Google Calendar public, you need to change the calendar settings. Follow this guide to make your Google Calendar public.
#Step 14: Create a New Calendar for Your Blog
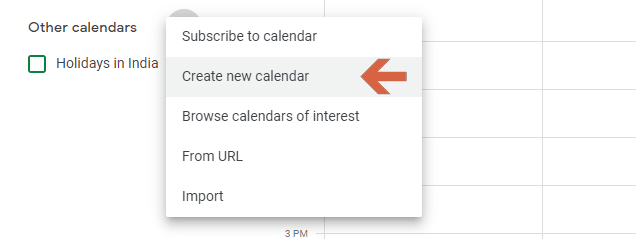
On the right-hand side panel, click on the plus (+) button and then Create New Calendar.
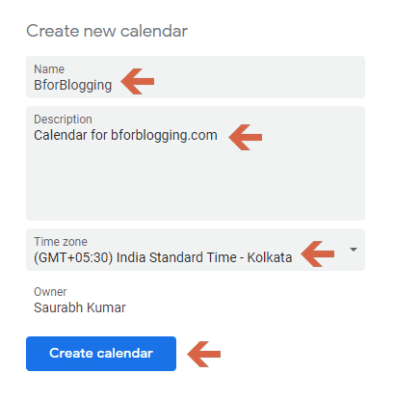
You will be redirected to a new page, enter your details and hit save as shown in the figure.
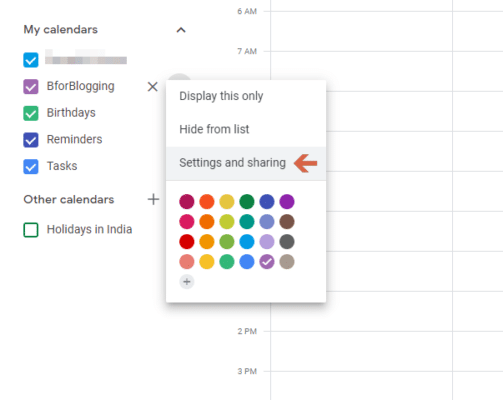
To change the settings, visit the Google Calendar homepage. Move the cursor to the calendar you want to share and click on the drop-down arrow next to the calendar.
Select Share this Calendar Option from the Dropdown menu.
#Step 16: Make Your Calendar Public
This will bring you the calendar sharing settings where you need to select the checkbox to make your calendar public. Store the changes by clicking the Save button.
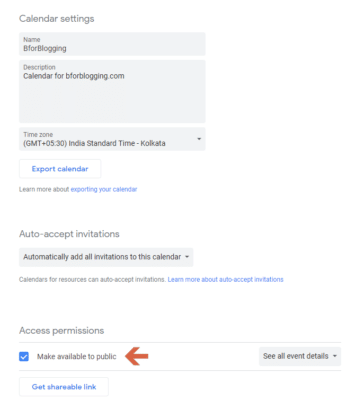
#Step 17: Find the Calendar ID
Last but the important thing you need to get the unique calendar ID. On later, you’ll need this ID to display the Calendar in your WordPress.
#Step 18: Get the Unique Calendar ID
Scroll down that page and you will find the section called ‘Integrate Calendar’. There you will find the calendar ID, copy and keep if safe for further use.
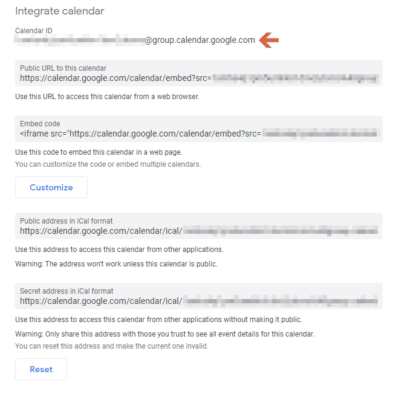
This is how you’ll successfully connect your Google Calendar with your WordPress site. Now, let see how to add Google Calendar in WordPress.
How To Add Google Calendar In WordPress?
Now head over to your WordPress dashboard to add Google Calendar in WordPress.
#Step 19: Add New Calendar
To add Google Calendar, you need to first visit the Calendars → Add New.
This will show you the screen which is similar to the post or page editing screen in WordPress.
#Step 20: Google Calendar Plugin Edit Screen
On this page, you’ll find some options like Add New Calendar where you need to enter a title for your calendar. On that screen, there will be a text area in which the plugin has already added some shortcodes and some text.
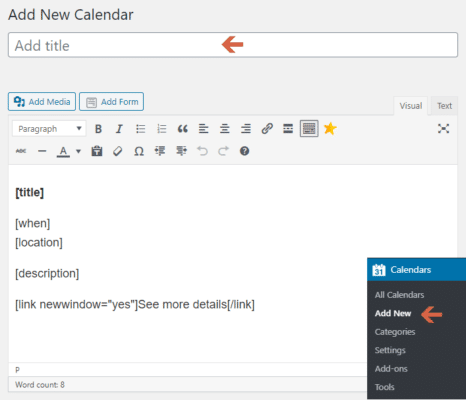
#Step 21: Enter the Calendar ID of Your Google Calendar
Find the Calendar setting under the Editor box, where you need to add Calendar ID, which you have generated in the previous steps. Click on Google Calendar tab and now paste your Calendar ID
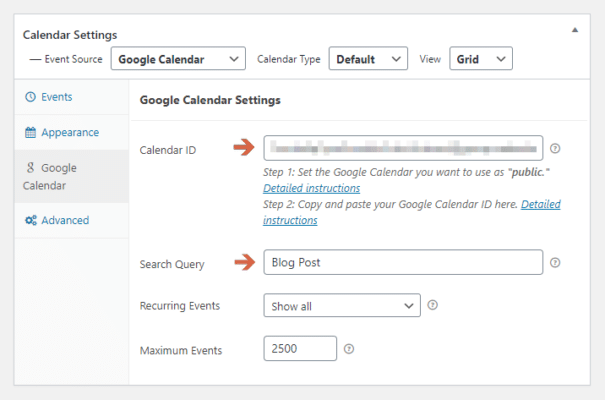
Also, you can click on other tabs in the calendar settings box to customize how the calendar will display on your WordPress site.
Once you did with this process, just click on the publish button and save your calendar.
How To Display Calendar on Your WordPress Site?
The whole process of adding Google Calendar on WordPress is not enough to make visible that calendar on your WordPress site.
#Step 22: Go to Calendar Setting
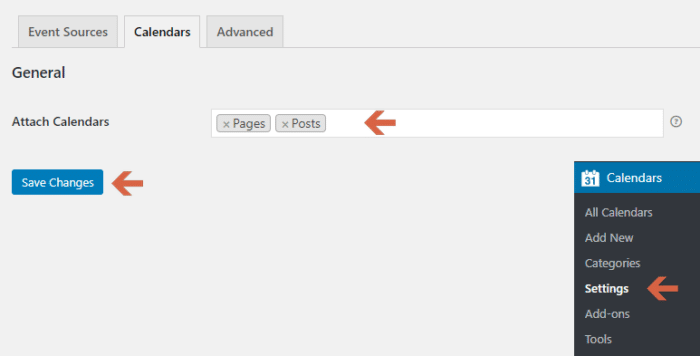
To add the calendar to your WordPress post or page go “Calendar Setting” page and click on the “Calendar” Tab.
#Step 23: Find Attach Calendar Setting
Under the “Attach Calendar” option select Page and post both options to visible “Add Calendar” button in page/post editor window. Click on the Save button.
#Step 24: Add Calendar In Any Post
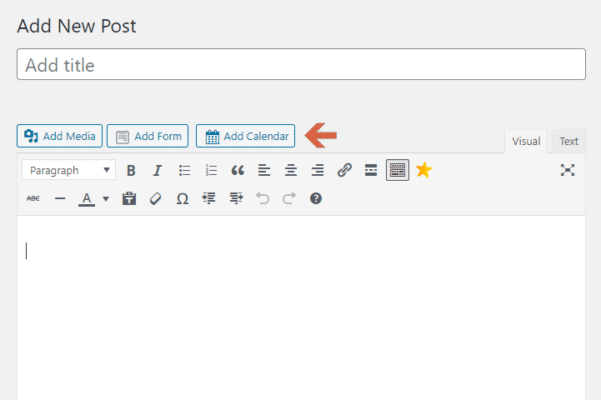
Now create a new page/post or edit the existing one to add Calendar. At a top of the editor window, you will find the “Add Calendar” tab. Click on that option, which will open a new popup window.
#Step 25: Choose the Calendar you need to Add
From the pop-up, select the calendar and click on the “Insert Calendar” option.
#Step 26: Publish the Post to View the Calendar
Click on Publish/Update button to view the calendar on live page/post.
Also if you want to display your Google Calendar in a sidebar widget, then this plugin offers a widget for that.
For that go to Appearance → Widgets page and where you can find Simple Calendar widget in the list of available widgets.
Add the Simple Calendar widget and click on the Save button.
#Step 28: Live Google Calendar in WordPress Post
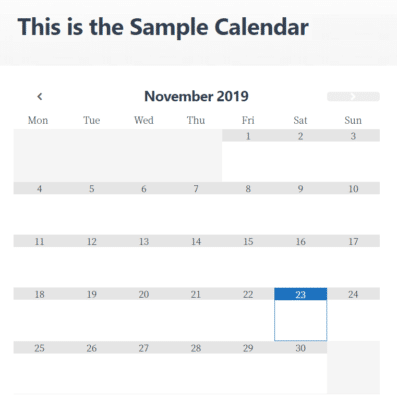
Finally, you have successfully made your Google Calendar visible on your WordPress site. Just visit your website and you’ll see your Google Calendar in action.
Wrapping It Up
Adding a Google Calendar to your WordPress site is something you can easily do in half an hour or so.
I hope you find this article helpful and make it easy for you to add Google Calendar on Your WordPress site.
Do let us know how you would like to use Google Calendar on your WordPress site.
Any question? Ask here, and I will get back to it very soon.
If you like the article, do share it across social media channels with your friends and keep spreading the good word!
Share your feedback and feel free to ask us by commenting below.
Stay tuned for more of such updates on Facebook and Twitter.
More to read –
