For a minor release, WordPress can automatically install updates itself, without any user inputs. But, for a major release, there is built-in update notification system in WordPress, with that you can easily get notified and update your WordPress site to the latest version.
Well, there are certain reasons for Why You Should Always Use the Latest Version of WordPress. I have covered the most important reasons in my previous post, you should check out that too, the link is given below.
Some of the website owners do not know that there is an update available for WordPress. The reason they do not log in to their WordPress dashboard regularly or not getting notified of the updates.
There is a way through which you can get notifications for WordPress Updates via email. Want to know how then let’ take a look for that.
Notify For WordPress Update Through Email
To get notified by email for WordPress Update, first, install and activate the WP Updates Notifier plugin. After the installation of WP Updates Notifier plugin, go to Settings → Updates Notifier and configure the plugin settings.
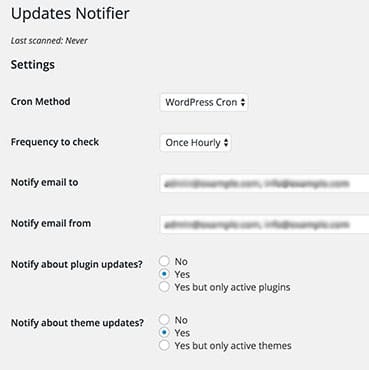
Every hour this plugin checks your site for updates and for that it uses WordPress Cron. You can also change this setting to once or twice in a day.
This plugin checks for updates like WordPress itself/core update, plugin updates, and themes updates.
To get notified, all you need to do is to save the settings and for that simply click on test email button. And you’ll receive a test email.
Once the plugin starts getting functioning, you can update WordPress through the WordPress Dashboard itself.
Install WordPress Updates From Dashboard
To update your WordPress site, first, log in to the dashboard of your WordPress and go to the Updates page then simply clicking on Re-install Now button will install those updates.

If you are using WordPress 3.7 or above, then by default the automatic updates are turned on for minor releases and you can also turn on the automatic updates for major releases, plugins, and themes.
There are three things you should keep update to with your WordPress site, and those are (1) WordPress core, (2) WordPress Plugins, and (3) WordPress Themes.
To update your current WordPress website with the latest version, there are two ways, automatic and another is manual.
Now, let see how to update WordPress with these two methods. First, let’s take a look for automatic installation.
Easiest Way to Upgrade WordPress Version
Few of the following methods are recommended by WordPress official website, learn more about the same here.
1. How To Install WordPress Updates Automatically?
You can also update WordPress automatically. WordPress offers you to enable automatic updates for a major release, Plugins, and Themes.
Automatic upgrading WordPress choice is a bit of unsafe.
Because if you are not using Managed WordPress Hosting, then your hosting service provider automatically updates your WordPress site with a major release of WordPress.
The automated system won’t take care of your site breaks and if that happens then you won’t be online to fix that break. You can only once you check the things manually and fix the site breaks.
But still if you like this option you can do it with two ways one is using the plugin and another is using code. First, we’ll take a look at the plugin method.
1.1 Update WordPress to Latest Version Automatically with Plugin
Install the Easy Updates Manager plugin and activate the same. After Activation, go to Dashboard → Update Options page for configuration of the plugin.
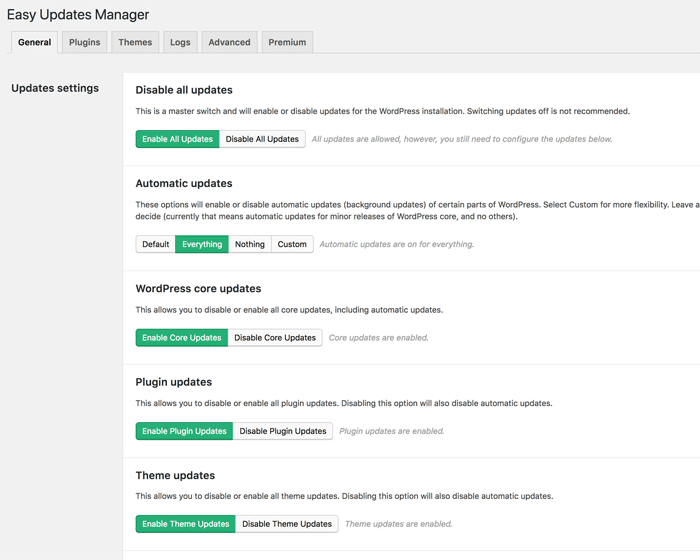
This will take you to the Automatic Updates page where you can enable automatic updates for WordPress itself/core, plugins, themes and translation files.
Once you made the changes save those settings and you are done.
1.2 Install WordPress Latest Version Updates Automatically by Using wp-config.php
To update the WordPress core automatically using the wp-config.php file, all you need to do is adding one simple coding into the wp-config.php file of your WordPress site.
define(‘WP_AUTO_UPDATE_CORE’, true);
Also, you can auto-update plugins and themes on your WordPress site, but for that, you have to add the following lines of code to your theme’s function.php file:
add_filter(‘auto_update_plugin’,’__return_true’);

add_filter(‘auto_update_theme’,’__return_true’);
So, from these are the two most recommended ways you can use to automatically Install WordPress Updates on your website.
Now, let’s take a look at the manual method to Install WordPress Updates.
2. How To Update WordPress to Latest Version Manually?
To install your WordPress Updates manually, you will need an FTP client. But before upgrading your WordPress, it is essential that you create a backup of your website first.
For that, you can use the plugin to create a backup, or you can also manually create a backup of your WordPress site. I have recently published a Guide to Create Manual Backup of WordPress site.
Also Read: The Most Useful WordPress Backup Plugins For Automated Backup
Once you are done with the backup, download the latest WordPress software from WordPress.org on your computer and extract the zip archive. Inside the zip archive, you’ll find a folder named WordPress.
Now, if you don’t have an FTP client installed on your computer, then download and install an FTP client. Use free FTP client named FileZilla, it works on both Windows and Mac.
2.1 Use of FTP To Upload WordPress
Now, use FTP client to connect your website and access the website’s root directory. Upload all the files inside the WordPress folder from your desktop to your website’s root directory.
Once you did this, your FTP client will start uploading files from the WordPress folder on your desktop to your web hosting server.
Throughout this process, your FTP client will ask you that the filename already exists in the target directory, please choose an action, then select Overwrite and make sure that it always uses this action.
2.2 WordPress Database Update
It is possible that a new WordPress release may include changes to the WordPress database. So this would require a database update.
- Once the task of uploading files on your website is completed, simply visit your WordPress admin area. This will show you a database update required notification.
- Now, click on Update WordPress Database button to continue with updating. WordPress will show you a success message after updating your database.
This is it. With these easy steps, you have successfully updated your WordPress website manually to the latest version.
So keep up to date with the latest version of WordPress and make your site more efficient. Hope you like this post. Don’t forget to share your experience with us.
Stay tuned for more of such updates on Facebook and Twitter.
More to read –
