One of the easiest ways to build a platform in today’s digital marketing world is a blog. In this article, we’ll learn how to start a blog.
Let’s dive into the deep details and explore how easily and quickly you can start a blog of your choice.
A blog can be created with free web hosting platforms like Blogger, WordPress.com, Medium or a few more.
I recommended hosting your blog with the best hosting service providers. Find a comparison of Blogger and WordPress and understand why a self-hosting service is better to host a blog.
Many newbie bloggers stuck at setting up their first blog. They assume that creating a new blog takes time.
But that’s not true. You can set up a blog in under 20 minutes.
Blogging has incredible opportunities like making money online, networking with like-minded people, and helping other people by guiding them.
You can move one step in just 20 min by starting your blogging journey.
In this article, I will share how you can start blogging with WordPress in a few minutes.
How To Start a WordPress Blog in Under 20 Minutes Flat
The following steps will guide you to start a WordPress blog. You must be thinking about why WordPress? because it is the most popular blogging platform in the world and used by more than 35% of the site around the globe.
#1. Collect Your Resources
The first step to set up a self-hosted blog on a platform like WordPress, there are a few of the resources that you need first. You will need:
- A domain name,
- One credit card and
- 20 minutes
It is easy if you haven’t registered your domain. It is even cheaper with NameCheap as they always have exciting deals too but a domain name.
Secondly, few of the hosting services like SiteGround, BlueHost, and DreamHost you need to signup to start a WordPress blog.
If you already bought a domain name, don’t worry skip the next point and navigate to Set Up your hosting account.
#2. Domain Registration
If you have decided to buy a domain name then I would recommend NameCheap, as they always have good offers to buy a domain name.
Make sure you pick your blog domain name which adds values and represents your blog’s brand.
Decide, for what rationality you need a domain name for a:
- Branded blog
- Small Business blog
- Micro-Niche blog
- Personal brand
Make the decision and buy a domain name.
Pro Tip: Take the help of Namech_k to check the availability of the domain and social media profile names.
#3. Set Up Your Hosting Account
Now the essential component that you need to set up first is your hosting account. Over here your WordPress Blog’s file will get stored.
You can say a computer/server saved your blog’s data. You will require purchasing hosting space to host your blog.
It is far easier than you thought. Simply follow the step.
There are hundreds or thousands of hosting services are available, but the one I trust more is SiteGround.
Because I have experienced, it’s best shared hosting services. Believe that it is the best option for most people for the following seven features:
- WordPress: The very first and exciting feature of this hosting service is that it is officially recommended by the WordPress platform.
- Ease of Use: This hosting service is super easy to use because of its interface and use of a customized cPanel dashboard.
- Support: SiteGround has great support of 24×7 through chat, phone or e-mail. Even the support staff is very quick, knowledgeable, and courteous. All of the support staff are located in the US.
- Reliability: This is a super reliable hosting service that boasts an uptime average of 99.9%, which is about as good as it gets.
- Limits: Theoretically, it offers plans with unlimited disk space, unlimited domains for multiple blogs or sites in one account, unlimited bandwidth, and unlimited e-mail accounts. However, there are some cappings. But you should not worry about the same, because the available limits are way more than required.
- Affordability: Above all, it is inexpensive shared hosting that costs from $3.95 to $11.95 per month. It based on which plan you choose. The longer you are ready to commit, the cheaper there pricing plan will be.
So if you are with me, then visit SiteGround and Get Started Now. Decide the hosting package and get ready to host your blog. Once you choose your plan; the next step is to point your registered domain name to the hosting service you just bought.
#4. Point Domain To Hosting Service
Once you purchase a domain name and hosting service, its time to connect both.
This is an easy process pointing a domain to hosting service. I am sure that you have a purchased domain from NameCheap and hosting from SiteGround.
Over here I will guide to point NameCheap Domain to SiteGround Hosting Service. Follow Below Steps.
#1. Step: First, log in to NameCheap and SiteGround Account.
#2. Step: At NameCheap Dashboard, click on the Manage button next to your domain name.
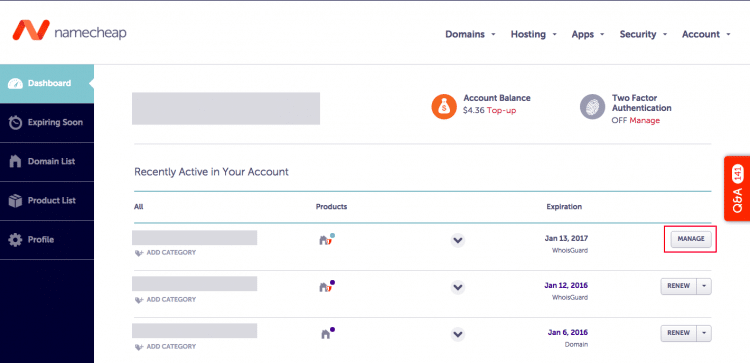
#3. Step: Under NameServers choose custom and enter the nameserver details provided by SiteGround. For example:
ns1.siteground.biz
ns2.siteground.biz

And Click on Save.
#4. Step: After that, at SiteGround, Go to cPanel and Navigate to Domain → Assign.
#5. Step: Enter the domain name.
#6. Step: Assign directory and click on save.
It may take a little longer time to complete the process. Don’t panic and wait for few minutes.
Once it gets connected, you will need to install WordPress to start a blog. Let’s move into that step.
#5. Install WordPress on Hosting
Now, you are set to start blogging but before that installation of WordPress CMS is essential because this is where you can manage all your content.
Previously the process of installing WordPress was a little bit complicated. But now SiteGround makes it very simple. Let me take you through the simple WordPress Installation process.
#1. Step: First of all, login to SiteGround Account and Go to the cPanel.
#2. Step: Under the Autoinstaller Section; Clik on WordPress icon.
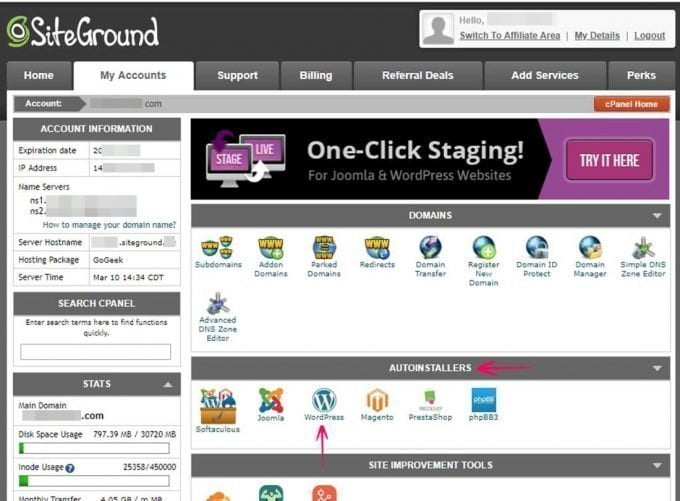
#3. Step: Click on Install Now button and you will be redirected to the WordPress installation page.
#4. Step: Select the domain name and enter other details as shown in the image.
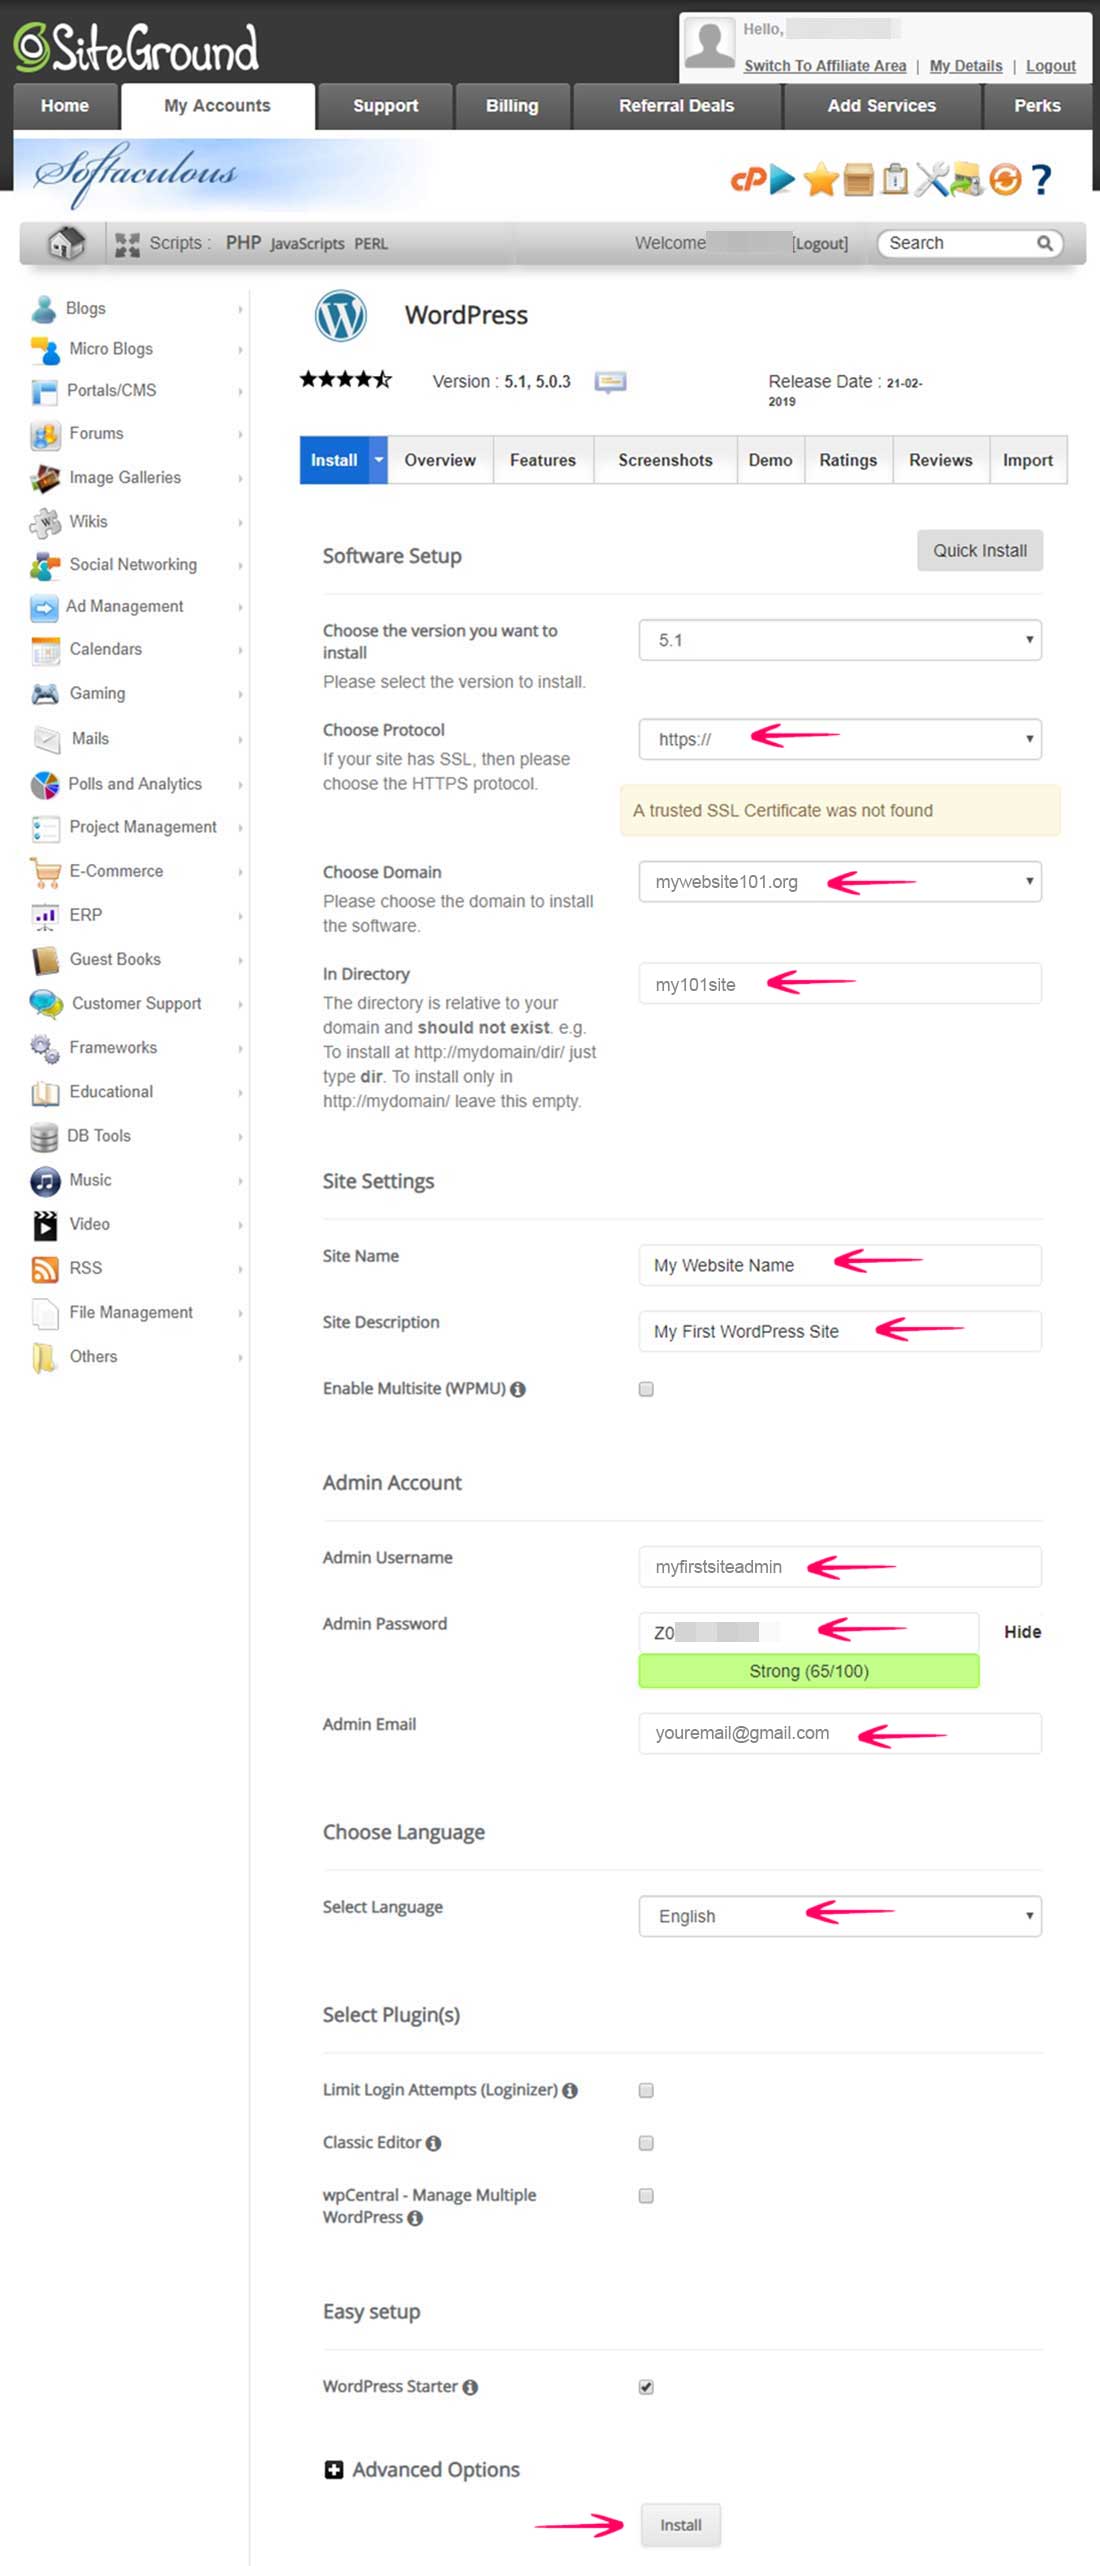
#5. Step: Assign Directory.
#6. Step: Enter the Username, Password, and email address.
#7. Step: Read license and service agreements and click on Install Now Button.
Pro Tip: After that, Save the username, password, and other information on a text file on your computer for further use.
Once the process of installation is completed, you will then present with the message that says Congratulations, the software was installed successfully!
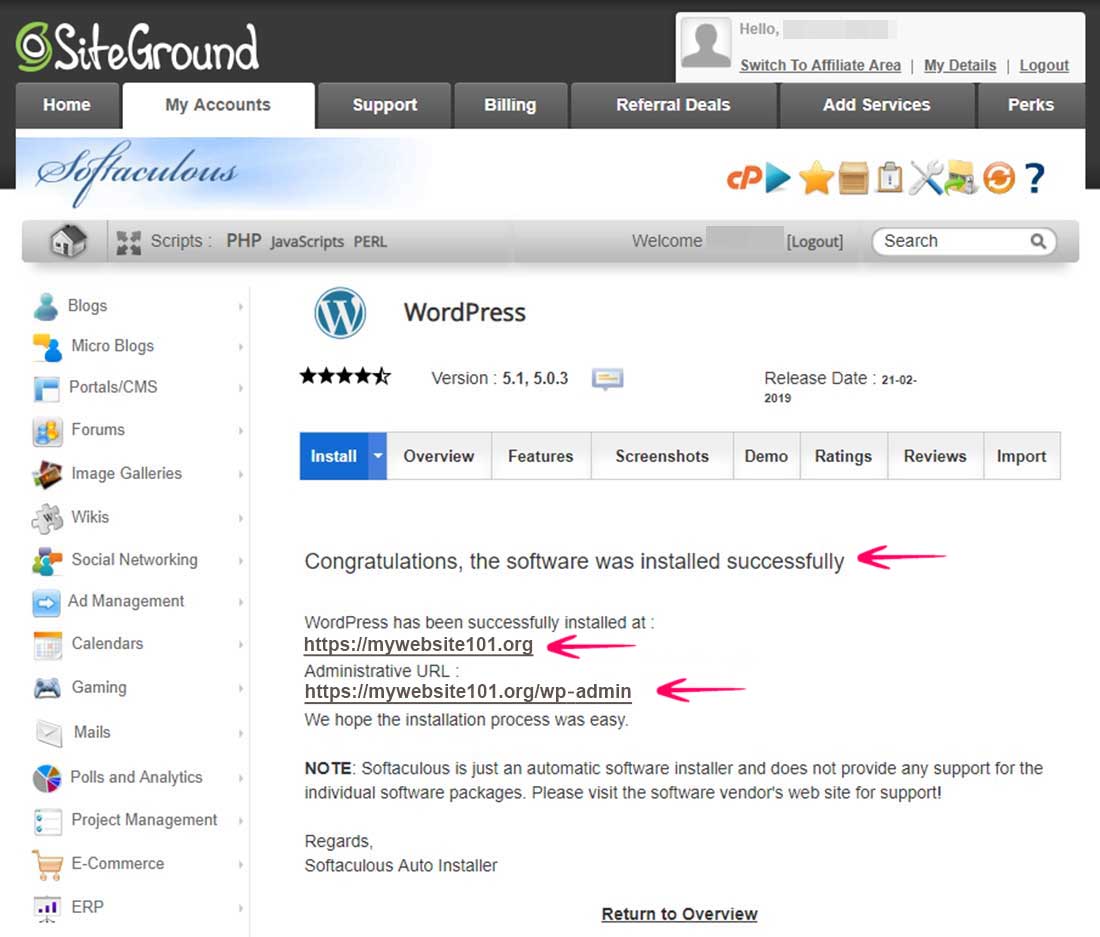
Right below that message, you will find your site URL, where WordPress has been installed and the administrative URL to access the login page of your WordPress dashboard.
Copy these links (Login URL, Blog URL) along with your username, and password in your text file for further use.
Even the web service SiteGround will e-mail this information to you on the email you have provided while installing WordPress.
Login to your WordPress by just clicking on the Admin URL link. And once you brought with WordPress Login page enter your Username and Password and tap on the login button.
Congratulation, your blog on WordPress is up and running now.
If you visit your blog, you will find some dummy content and the classic design of the blog.
Remove those dummy pages, posts, and plugins (if any) and move to next to give a stylish look to your blog.
#6. Install Theme And Plugins
Once WordPress is installed, your blog will be active. But this platform will activate the default theme on your blog. However, you can change this theme by visiting the Appearance tab in the WordPress dashboard.
There are thousands of themes available at WordPress themes repository for free, pick the once you like and use it.
Or else you can explore the premium themes like Divi from Elegant Themes, and other themes from the developers like WP Astra, GeneratePress and My Theme Shop, and search for free WordPress theme on the web.
I recommended going with the paid theme as many of free theme does not update frequently and may have a chance to get hacked.
To install a theme on your WordPress blog you need to:
- Visit the Appearance tab
- Tap on Add New.
- Over here upload the ZIP Folder of downloaded theme and
- Activate the same after uploading.
Further, the same easy process you have to follow to install the required WordPress plugins. Navigate to Plugins → Add New and search for Plugin.
I recommend below plugins for beginners:
- Yoast SEO – To optimize your blog for search engine friendly.
- W3Total Cache – To speed up your blog.
- Disqus – For blog comments.
- WP Forms – To create a contact form.
- ShortCodes Ultimate – To add extra designed elements in blog posts.
#7. Write Your Post
To create your very first post in the WordPress dashboard, click on the Post and Add New option and here you can start writing your first post for your blog.
Once you are done writing your post just publish it by directly hitting on Publish button.
#8. Blogging Hacks
It is essential that you always keep a practice to understand and implement blogging hacks to achieve your goals quickly. To do that you must follow pro-blogger and study what other bloggers are doing.
As an initial step read out a few blog posts, which will help you to act like a pro-blogger and boost your blog among the targeted audience.
This is it!
I hope you have set up your first blog and I am really happy to see it. Share your blog URL below in comments (Opps I shared an idea to generate link building).
If you like the article, do share it across social media channels with your friends and keep spreading the good word!
Share your feedback and feel free to ask us by commenting below.
Stay tuned for more of such updates on Facebook and Twitter.
More to read –
